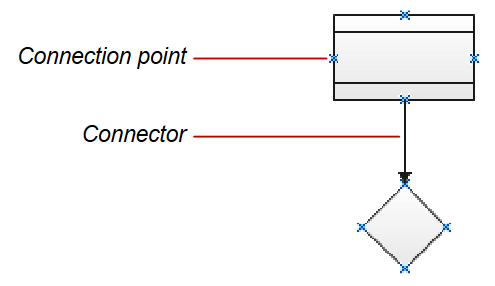
In some drawings, such as flowcharts and system diagrams, it’s essential to connect shapes to indicate the flow of operations, procedures, or logic. In Visio, the lines that link two objects are called connectors. Connectors can attach themselves in two ways: to a specific connector point on a shape, known as a “point” connection, where the connector remains fixed to that point, or to the shape itself, known as a “shape” or “dynamic” connection, where the connector automatically chooses the best connection point based on the relative positions of the shapes. This dynamic behavior ensures that the connector maintains an optimal connection as shapes are moved or rearranged.
Try This Yourself:
Prerequisite for the Exercise
Before starting this exercise, please follow these steps:
- Download the File: Fill out the form below to get the Visio-How-Tos–Adding-and-Editing-Connectors.vsdx file.
Download Form
- Open the File: After downloading, open the file to begin the exercise.
Exercise Steps
1. Select the Connector Tool: Make sure the Connector tool  is active in the Tools group on the Home tab

2. Connect the Process to the Decision Shape:
- Hover over the Process shape until a green box appears around it.
- Press and hold the left mouse button, then drag the connector down until a green box appears around the Decision shape.
- Release the mouse button to establish a shape-to-shape connection between the two shapes.

3. Connect the Decision to the Process Shape:
- Hover over the Decision shape until a green box appears around it.
- Press and hold the left mouse button, then drag the connector down until a green box appears around the Process shape.
- Release the mouse button to establish a shape-to-shape connection between the two shapes.
4. Create a Point-to-Point Connection:
- Hover over the right connector point of the Decision shape until a green box appears around the connection point.
- Press and hold the left mouse button, then drag the connector up until a green box appears around the right connector point of the Process shape.
- Release the mouse button to establish a point-to-point connection between the two shapes.
5. Select the Pointer Tool:
- Click on the Pointer tool
 in the Tools group on the Home tab.

6. Adjust the Right-Angle Connector:
- Select the Right-Angle Connector.
- Hover over the bottom endpoint of the connector until the pointer changes to a four-headed arrow
 .
. - Press and hold the left mouse button, then drag the endpoint to the left of the Decision shape until a green box appears around the left connection point.
- Release the mouse button to glue the connector to the left connection point.

7. Adjust the Connector’s Top Endpoint:
- Hover over the top endpoint of the connector until the pointer changes to a four-headed arrow .
- Press and hold the left mouse button, then drag the endpoint to the left of the Process shape until a green box appears around the left connection point.
- Release the mouse button to glue the connector to the left connection point.
8. Reshape the Right-Angle Connector:
- Hover over the middle handle of the right-angle connector until the pointer changes to a double-headed horizontal arrow
 .
. - Press and hold the left mouse button, then drag the middle handle to the right until the connector fits as shown.
- Release the mouse button to reshape the connector.
Recommended Training Series
- Visio for IP Professionals: Join our “Visio for IP Professionals” training series to master the art of creating precise patent drawings with Microsoft Visio, enhancing your efficiency and expertise in the IP field.
Recommended Webinars
Further explore the topics covered in this article by attending our webinars. These sessions offer additional insights and the opportunity to ask questions and interact with experts in Visio for patent practice.
- Introduction to Visio for IP Practitioners: Dive into the world of Visio with our webinars tailored for IP practitioners, offering a comprehensive introduction to utilizing this powerful tool for patent drawings.
- Basic Visio Skills for IP Professionals: Discover the fundamentals of Microsoft Visio in our webinar tailored for IP professionals, covering basic skills to streamline your patent drawing process.
- Basic Visio Use Cases Demonstration: Explore practical applications of Microsoft Visio in our webinar, demonstrating basic use cases to improve your patent drawing efficiency and effectiveness.
- Visio Q&A Fridays: Join our “Visio Q&A Fridays” webinar series to get expert answers to your questions and enhance your proficiency in using Visio for IP-related work.
Provide Feedback
We value your feedback! Let us know how we can improve or what topics you’d like to see next.
Connect with Mike
Have questions or need support? Connect with Mike for personalized assistance.
Share Your Experience
Found our series helpful? Share it with your network and help others benefit too!
Leave a Reply
You must be logged in to post a comment.