Many years ago, a new diagramming product hit the marketplace with a revolutionary way to draw. Rather than construct drawings from geometric primitives like lines and arcs, Visio offered the ability to drag and drop pre-built shapes. One of the early tag-lines for Visio was Drag, Drop, Done. Making diagrams in Visio is more a matter of assembling than drawing, and this mechanism made diagramming approachable for many people.
So how does drag and drop really work?
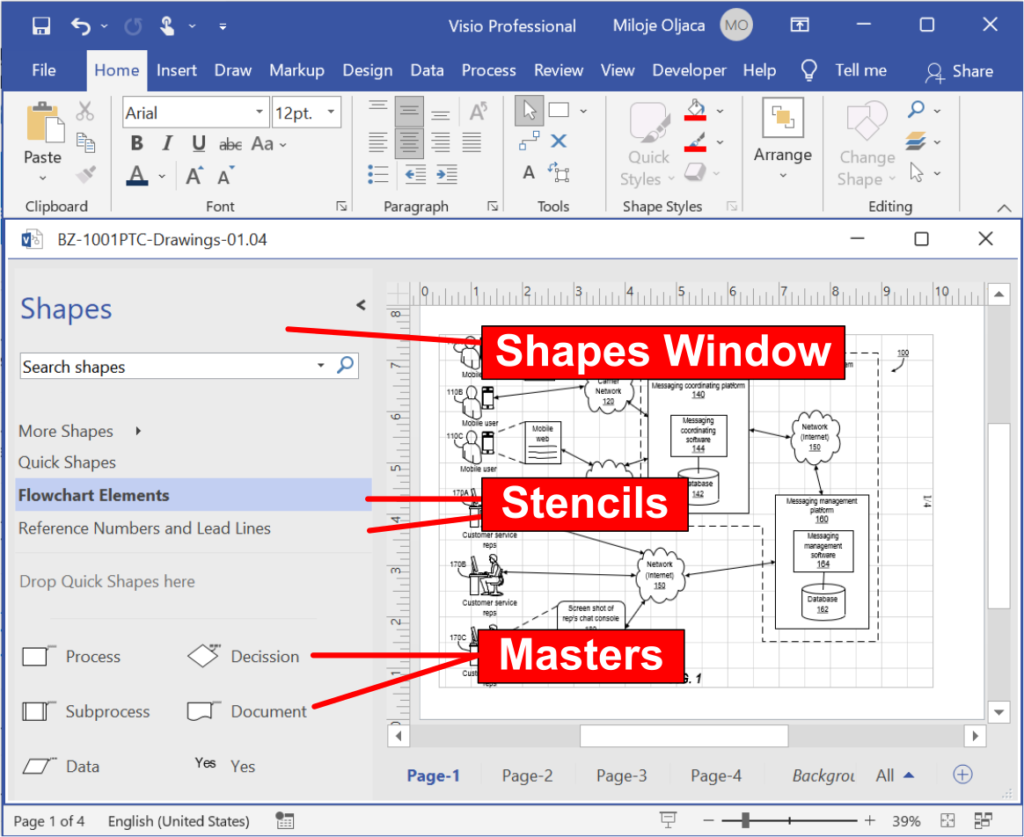
The pre-built shapes are called Masters, often referred to as Master shapes. The masters are organized into documents called Stencils. The stencils are displayed on the left side of the drawing workspace inside the Shapes window. To add a shape to the drawing, you drag one of the masters from a stencil to the drawing page.
Try This Yourself:
Prerequisite for the Exercise
Before starting this exercise, please follow these steps:
- Download the File: Fill out the form below to get the Visio-How-Tos–Dragging-and-Dropping-Shapes.vsdx and IP-DaVinci-Stencil—Basic-Flowchart-Elements.vssx files.
Download Form
- Open the File and Stencils: After downloading, open the file and stencil(s) to start the exercise.
Exercise Steps
1. Activate IP DaVinci Flowchart Elements Stencil: If not already activated, click on the Flowchart Elements Stencil to view the custom shapes available in this stencil.
2. Place the Process Shape: Hover over the Process shape until the pointer changes to a four-headed arrow ![]() . Press and hold the left mouse button, then drag the shape into the canvas and release to place it. Click on a blank area to deselect the shape if needed.
. Press and hold the left mouse button, then drag the shape into the canvas and release to place it. Click on a blank area to deselect the shape if needed.
3. Align the Decision Shape: Drag and drop the Decision shape under the Process shape until green alignment guides appear, indicating that the center, left edge, right edge, or all three are aligned. Release the mouse to place the shape..
4. Space the Process Shape: Drag and drop the Process shape below the Decision shape until alignment guides and two spacing guides appear, indicating equal spacing. Release the mouse to place the shape.
Recommended Training Series
- Visio for IP Professionals: Join our “Visio for IP Professionals” training series to master the art of creating precise patent drawings with Microsoft Visio, enhancing your efficiency and expertise in the IP field.
Recommended Webinars
Further explore the topics covered in this article by attending our webinars. These sessions offer additional insights and the opportunity to ask questions and interact with experts in Visio for patent practice.
- Introduction to Visio for IP Practitioners: Dive into the world of Visio with our webinars tailored for IP practitioners, offering a comprehensive introduction to utilizing this powerful tool for patent drawings.
- Basic Visio Skills for IP Professionals: Discover the fundamentals of Microsoft Visio in our webinar tailored for IP professionals, covering basic skills to streamline your patent drawing process.
- Basic Visio Use Cases Demonstration: Explore practical applications of Microsoft Visio in our webinar, demonstrating basic use cases to improve your patent drawing efficiency and effectiveness.
- Visio Q&A Fridays: Join our “Visio Q&A Fridays” webinar series to get expert answers to your questions and enhance your proficiency in using Visio for IP-related work.
Provide Feedback
We value your feedback! Let us know how we can improve or what topics you’d like to see next.
Connect with Mike
Have questions or need support? Connect with Mike for personalized assistance.
Share Your Experience
Found our series helpful? Share it with your network and help others benefit too!
Leave a Reply
You must be logged in to post a comment.